How to Set Up an Online Store

Selling your products and services online rather than in-store means that you need a website with the capability to handle an online store. But while setting up an online store might seem complicated and time-consuming, it’s actually not as difficult as it seems!

Where possible, many businesses are moving some–or all–of their products and services online. Have you been investigating transitioning some of your business’ sales and operations to ecommerce?


To get started, all you need is a website that’s powered by WordPress—we’ll show you how to do the rest using WooCommerce, a free and open source plugin that allows you to easily set up a functioning web store, complete with payment and shipping options, in minutes.


What you’ll need to get started

  • A website powered by WordPress
  • Products or services to sell
  • 30-60 minutes to set up and add products to your online store


Set up and install WooCommerce


Step 1: Find and install the WooCommerce plugin

First, you’ll need to install WooCommerce on your WordPress website. You can download it for free from the WordPress repository, or you can install it directly from your WordPress dashboard.

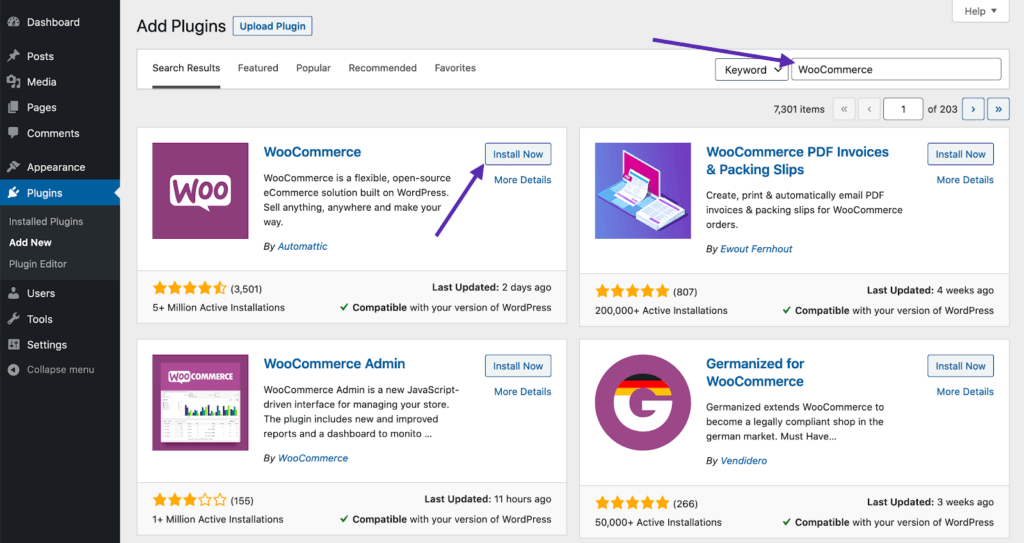
Log in to your WordPress dashboard and navigate to Plugins > Add New. Search for “woocommerce”, and click Install Now on the WooCommerce plugin (Note that the correct plugin’s author will be listed as Automattic). Wait a moment for the plugin to install, and then click Activate.

The plugin will now be active on your WordPress site.

Step 2: Follow the Setup Wizard

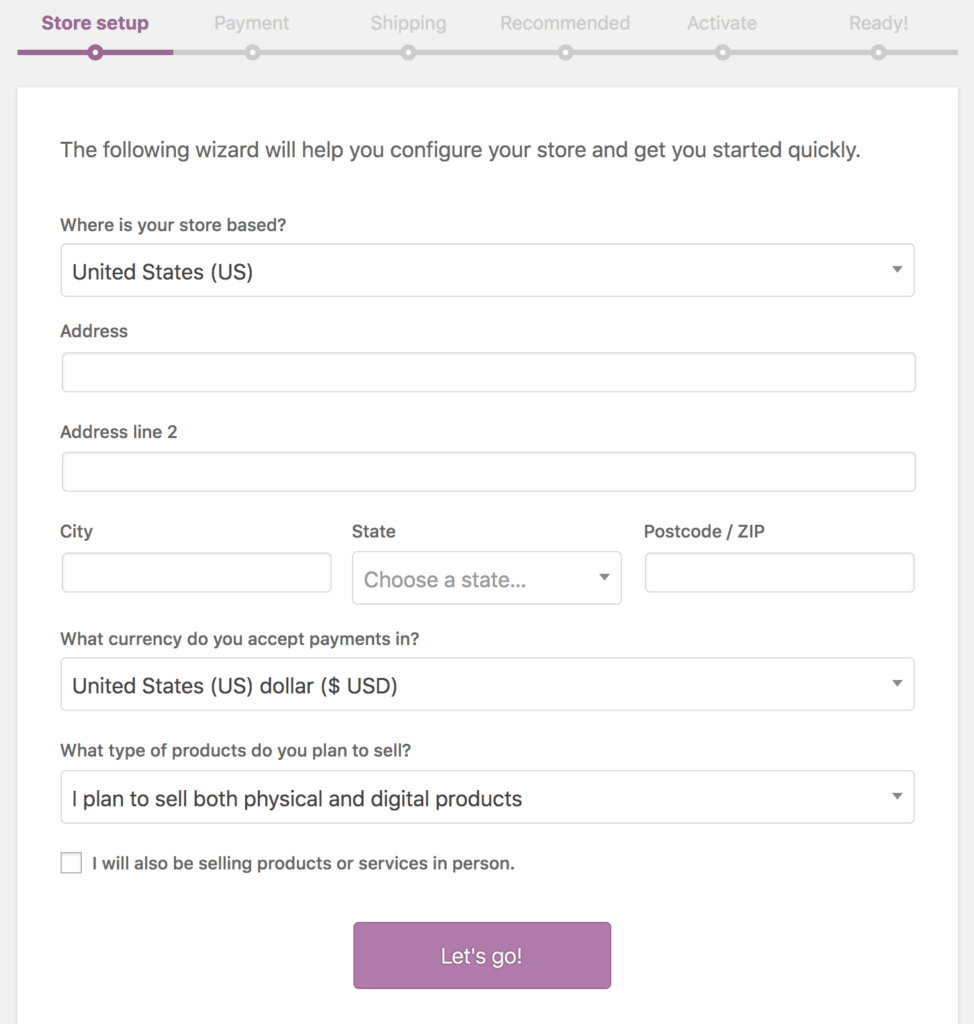
After installing WooCommerce, you’ll have access to the WooCommerce Setup Wizard to configure your store’s key settings like location information, payment and shipping methods, and types of products that you’ll be selling. Note that everything you choose in the setup wizard can be changed later on in your WooCommerce settings.

You’ll first enter information about your store’s address, the currency you accept, and whether you’ll be selling digital or physical products (or both).

Step 3: Choose your payment processing methods

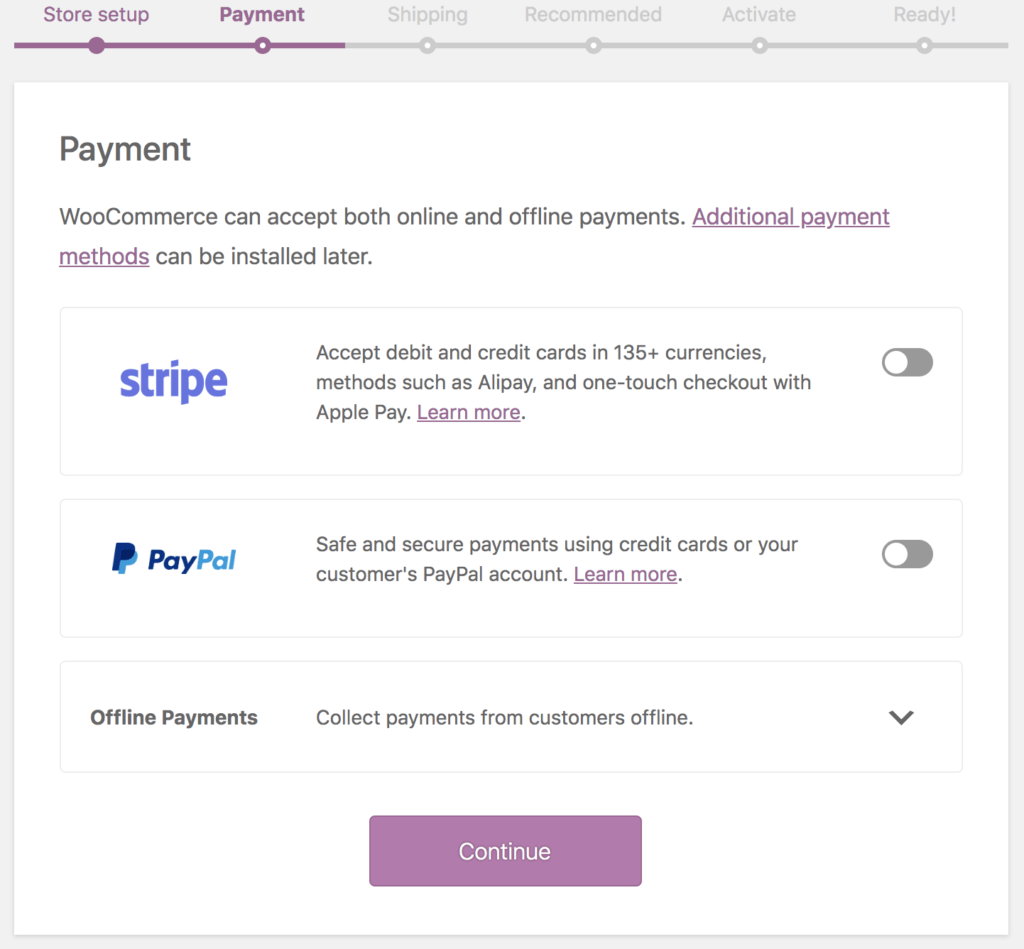
Next, you’ll choose which payments you’ll accept using your online store. By default, you can use Stripe and/or PayPal, but you can also choose to accept offline payments like checks and cash.

Select the options you’d like to use, and WooCommerce will set them up for you. Extensions that allow you to use more payment processing methods are available, if necessary.


Step 4: Choose a shipping method

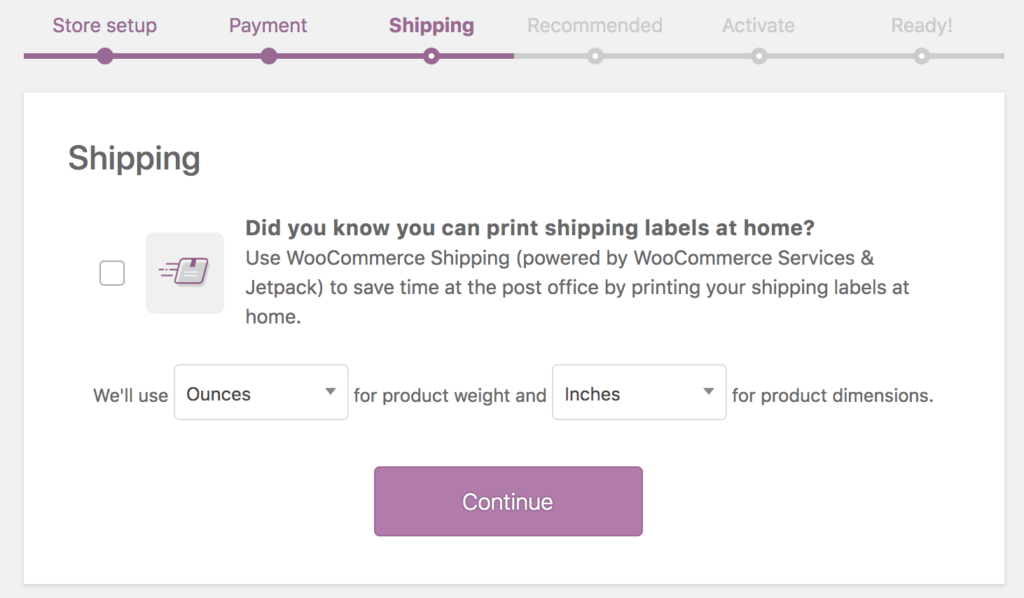
You can also configure how customers will be charged for shipping. You can set one rate for your specific business area, as well as other rates for customers outside of your business’ area.

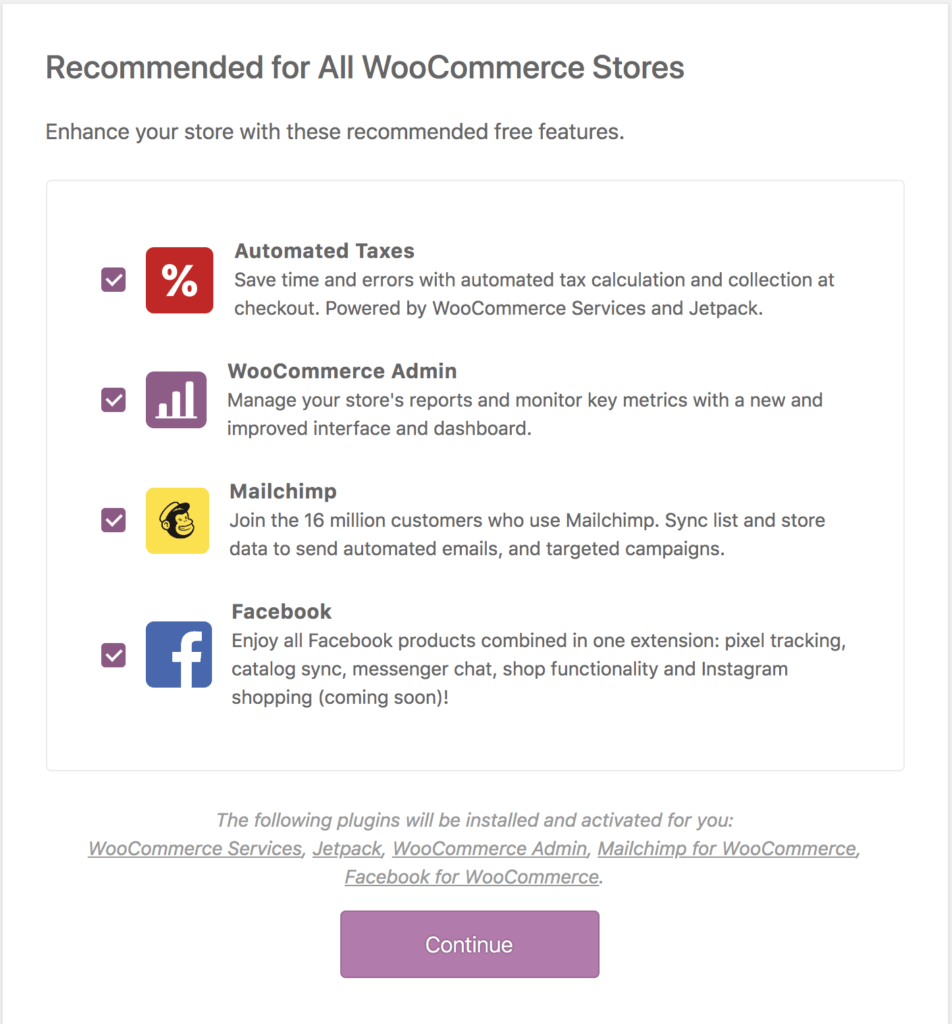
Step 5: Choose optional add-ons

Once you’ve configured the basic settings for your online WooCommerce store, you can review optional add-ons. None of these add-ons are necessary to run your store, but some, such as Storefront, can simplify certain aspects of setting up your store.

Step 6: Finish setup

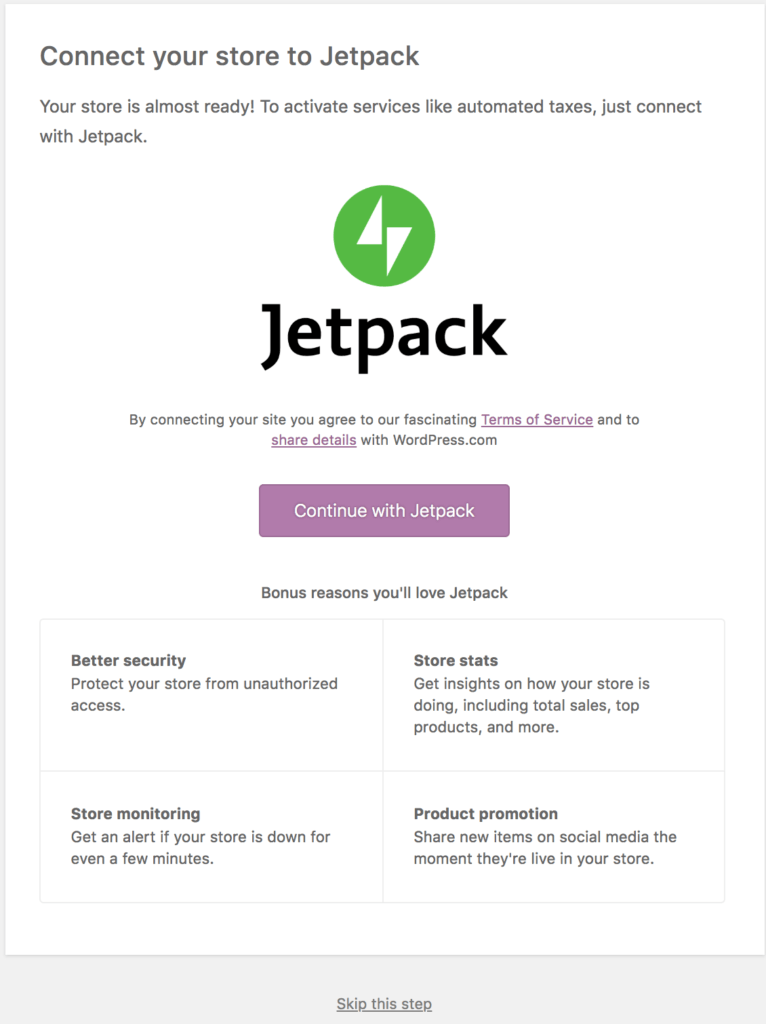
Before completing the setup process, you can choose to enable Jetpack, which is another WordPress plugin with additional features that can help in setting up and running your store. This plugin is not required, however WooCommerce recommends that if you’re in the U.S., you’ll want to enable Jetpack given recent legal changes.

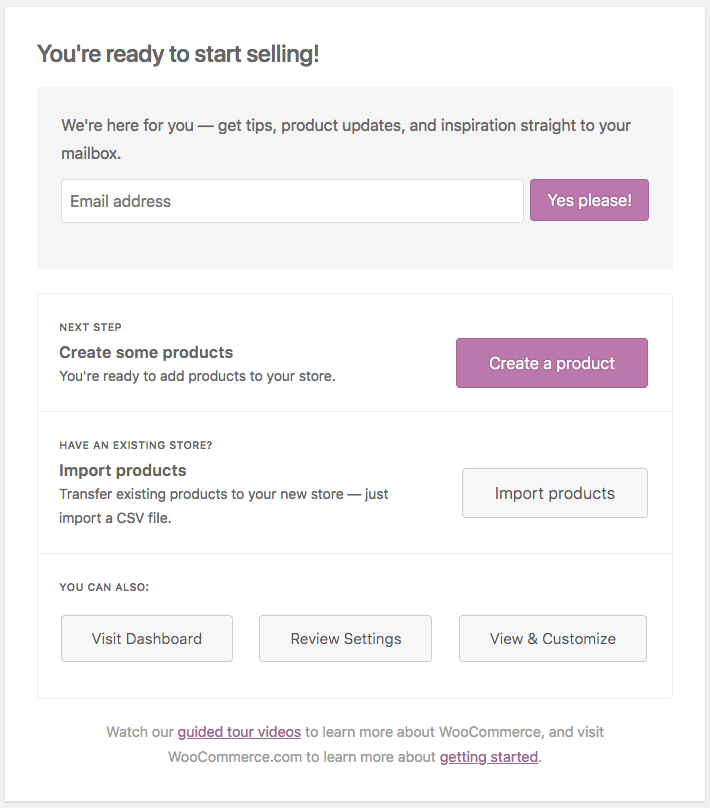
Once you’ve completed the steps above, your store will now be ready for use, and you can begin adding your products to it.


Managing your WooCommerce store

After installing WooCommerce, two new tabs will be available on your dashboard’s side menu: WooCommerce–which contains your store settings, and Products, containing your product settings.

Follow the link at the end of the Setup Wizard or go to Products > Add New to begin adding products to your store.

WooCommerce has extensive documentation and tutorials on how to set up, manage, and operate your store. Here are some handy links for how to add products, sell and ship them, manage orders, and more:


Add and manage products

Adding and Managing Products

Adding Product Images and Galleries

Managing Product Categories, Tags and Attributes

Product CSV Importer and Exporter


Payment options

Managing payment options (Stripe, Paypal, payment on delivery, etc.)

Setting up Taxes in WooCommerce

Which Payment Option is Right for Me?


Shipping options

Managing shipping options (Flat rate, local pickup, free shipping, etc.)

Setting up Shipping Zones

Product Shipping Classes


Order management

Managing Orders

Email FAQ


Need a hand to build your website? Our professional Designers, Copywriters, and Digital Experts build, launch and maintain a website with all the essentials included.We will also keep your website fresh and up-to-date to ensure it ranks well on search engines. You get unlimited standard changes to design, copy and business details. Learn more here! 

By Operations Manager June 1, 2021
300 million—the number of people on Instagram every single day. Businesses are taking advantage of Instagram by using it as a resource to gain popularity and increase their customer base. In fact, top brands like Nike and National Geographic have over 60 million Instagram followers! So why would any business pass up this opportunity? If you’re not a regular ‘grammer, starting your own page (and growing it) can be overwhelming. The success of your Instagram will be determined by how you run your account. These Instagram tips will help you gain a booming fan following, and lead the way to sensation status. Instagram Tips #1: #Hashtags Hashtags could be one of the most important components of gaining popularity on Instagram. Posts that include at least one hashtag have seen up to 12.6% increased engagement . To put it simply, hashtags are a tag that helps categorize photos with the same theme or content. In your mastery of hashtags, make sure to keep them short, simple and most importantly, relevant. For example, when posting a photo of my fancy new watch, I may use the hashtags #watch, #michaelkors and #rosegold. Short, sweet and descriptive. If you want to connect to local ‘grammers, hashtags with your location are a good idea. Additionally, many businesses create their own unique hashtag and ask their followers to use it. For example, Coca-Cola encourages their fans to post Instagram Coke photos with the hashtag #ShareaCoke . This can be a great marketing tool, and help define your brand online. Another important note to remember is to not over-hashtag, as this can make your posts look spammy, and will actually attract other spam accounts. Instagram Tips #2: Tag a brand When you tag another Instagram account in your photos, your photo will show up in the brand’s ‘“photos of you” section of their profile. They will receive a notification, and with any luck, may even engage with your post! Better yet, they could also start following you back, or even re-gram your photo! Make sure the photo actually features the brand, otherwise you can get flagged for spam. Most big brands will have an Instagram account, and chances are, they probably have an expansive list of followers themselves. For example , a jeweler could take a photo of a piece from their newest collection, and tag the designer in the photo. Getting some exposure from a big brand could help you significantly increase followers, and in turn, get more likes! Instagram Tips #3: Use Visually Appealing Photos Although it seems obvious, this point is oh-so important. You don’t have to be an expert photographer to have a stellar collection of Instagram photos, but you may need some practice. One of the most important bits of advice is to keep it simple. If you are featuring products in a photo, make sure the background is simple so that your product stands out. A cluttered photo will take away from what you are trying to promote. Sometimes, a crisp white background is the best option. Instagram has many filters to choose from, so take some time to play around with them to see which one suits your photo best! Does your photo look best without a filter? Simply leave it alone! Alternatively, Instagram gives you the option to use their editing tools, where you can make some simple adjustments like brightening or removing shadows, rather than choosing a filter. Take a few different photos and decide which is the most visually appealing. Taking good photos may take a bit of time, but like anything, practice makes perfect. Don’t give up, and you’ll be taking photos like a pro in no time! Instagram Tips #4: Know Your Audience It’s important to remember your audience and who you are targeting with your posts. What is the purpose of your Instagram page? Whether the purpose is to educate, promote or entertain followers, you should keep that in mind with each and every photo and caption. If your account is purely professional, keep it informative and concise. If you are marketing towards a younger audience and want to keep things fun and upbeat, ensure the dialog matches accordingly. Try using some emojis, be goofy and have fun! Show people what you are passionate about, and just remember to target the people with your same interests! Instagram Tips #5: Ask For It Your Instagram account is a conversation point with your customers. Most followers scroll through their feed passively, and won’t take any action unless it’s asked of them. Give them a call to action, and ask for it! For example, Double tap if you like coffee, tag a friend who likes coffee, share this photo if you love coffee, click the link in our bio for free coffee, etc. (Can you tell what’s on my mind right now?) If your customers oblige, this will increase your page’s activity, likes, and followers. Most importantly, don’t forget to have a little bit of fun! Happy ‘grammin!
By Operations Manager June 1, 2021
The importance of responding to customers online could not be more prevalent as reviews continue to grow more than ever before. Aside from the fact that reviews from customers help others decide whether they should visit a business or not, reviews are now more prevalent on search results pages—meaning a lot of eyes can see what is being said about your company online. The influence that reviews have on shoppers is staggering: more than 88% of online shoppers incorporate reviews into their purchase decisions (Webrepublic, 2015). Businesses are told to get more reviews on review websites to keep attracting new customers. With so many review websites out there, where does a business even begin? Your business may be afraid to manage customer reviews on review sites as you may not want to end up in one of these situations: receive zero reviews receive zero recent online reviews receive negative online reviews or, your business simply has unmanaged online reviews across multiple review websites Unfortunately, your business is missing out. This lack of free online word of mouth is actually hurting your business through inaction, because reputation drives conversion. 1) Business reviews and social posts help shape your company’s online reputation In fact, one of the worst things your business can do is ignore your online reviews and social posts. As easy as it is to make a mistake when handling your business’s online reputation, it can also be easy to recover if done properly (and with apology). While damage will inevitably happen, your business can take steps to mitigate the degree of damage that can occur. The biggest mistake of all your company can make is not participating in helping to shape the conversation about your company online. 2) Business reviews provide valuable feedback for your business While it can be easy for your business to take negative comments to heart, it is important to recognize that reviews are constructive feedback. All in all, reviews are valuable feedback! They help your company gauge their performance and see how you can improve. There is always room for improvement and a lot can be learned even from positive business reviews. Through reviews, your business can see which products or services you should be boasting, which needs work, and even discover which employees rock at customer service. 3) Your business reviews can now appear in search results Search engines have caught on to the popularity of reviews and are now displaying them more prominently. So, if someone searches for your business, there is a chance that reviews from review websites could be displayed on the search engine results pages. In Google’s markup—the annotated content that appears in search—of a company or product, business reviews and ratings can now be included in search results. In other words, when a user performs a search on Google, Google will find and possibly display review summaries from online business reviews and consumer ratings. Below is an example of how business reviews now showing up in search results.